Auto Reply Triggers for Real-Time Agent Responses
Unlock real-time AI agent responses with Portal One Auto Reply Triggers. Configure automated actions, manage conversations effectively, and boost productivity. Learn how!
Learn how to set up and use Auto Reply Triggers in Portal One to make your AI agents respond automatically to messages and events, orchestrating dynamic conversation flows with enhanced responsiveness and efficiency.
Take your AI agents from passive listeners to proactive participants with Portal One's Auto Reply Triggers. This powerful feature is key to unlocking sophisticated orchestration and automation, allowing you to define specific conditions under which an agent will automatically generate a response or perform an action. The result is enhanced responsiveness and efficiency in your AI-driven workflows. Whether you want to create a "ChatGPT-like" interactive experience, summarize discussions, or ensure timely follow-ups, Auto Reply Triggers are essential.
This guide is particularly beneficial for users who manage projects or teams and rely on AI for communication and task execution, such as project managers, team leads, and customer support teams, who are familiar with basic agent setup and want to elevate their agents with automated, real-time reactions.
Core Concepts: The "When" and "What" of Auto Reply Triggers
Auto Reply Triggers are rules you define within an agent's "Runtime" settings. They continuously monitor conversations for specific conditions and, when met, queue a designated agent to act.
The "When" - Trigger Conditions:
You can configure triggers based on:
- Message Creator (
reply_to): Trigger an action based on who sent the message. This can be:any_other: Anyone interacting with the agent, excluding the agent itself. This is common for creating conversational "host" agents.- A specific User Role (e.g., "Admin," "Owner").
- Another specific AI Agent.
- Number of Messages (
interval): Trigger an action after a certain number of messages have been created in a specified channel within the current conversation. For example, "after 1 message" for an immediate reply, or "after 10 messages" for a periodic summary. - Time Elapsed (
duration): Trigger an action if a certain amount of time has passed since the last message in a specified channel. You can define the duration in minutes or hours (e.g., "after 10 minutes" of inactivity). - Channel Context (
channel): All triggers are scoped to a specific channel within the conversation, allowing for targeted automation. For more details on organizing communication, see our guide on Message Routing & Channels.
The "What" - Triggered Action:
When a trigger's conditions are met, the agent you specified in the trigger rule is added to the message generation queue for the current conversation. This agent will then generate a response or perform an action based on its own configuration (instructions, connected tools via MCP Integrations, knowledge, etc.).
Practical Use Cases & Examples
Auto Reply Triggers unlock a variety of automated behaviors:
- Interactive Host Agent (ChatGPT-Style):
- A "Host Agent" is typically the primary AI agent a user interacts with in a conversation, designed to be responsive and manage the flow.
- Setup: Configure this Host Agent (e.g., "Support Bot") with a trigger:
Agent: SupportBot,Reply to: any_other,After: 1 messages,In: generalchannel. - Result: Support Bot automatically responds after every message a user sends in the "general" channel, creating a continuous conversational flow.
- Automatic Conversation Summarizer:
- Setup: Create a specialized "Summarizer Agent." Configure a trigger in your host agent's Runtime:
Agent: SummarizerAgent,Reply to: any_other(or any message creator),After: 10 messages,In: generalchannel. Instruct "Summarizer Agent" to read the previous messages and creates a summary. - Result: Every 10 messages, Summarizer Agent posts a summary, which becomes part of the conversation's accessible context for all participating agents.
- Setup: Create a specialized "Summarizer Agent." Configure a trigger in your host agent's Runtime:
- Idle Conversation Follow-Up or Review:
- Setup: Create a "Reviewer Agent." Configure a trigger:
Agent: ReviewerAgent,Reply to: any_other,Duration: 30 minutes(since last message),In: generalchannel. Instruct "Reviewer Agent" to check conversation status, perhaps offer further help, assign a rating, or use a tool to close the chat if appropriate. - Result: If a conversation goes idle for 30 minutes, Reviewer Agent steps in to take a predefined action.
- Setup: Create a "Reviewer Agent." Configure a trigger:
Step-by-Step: Setting Up Auto Reply Triggers
You configure Auto Reply Triggers in an agent's settings, specifically on the "Runtime" tab. These settings define the default trigger behavior for all new conversations initiated with this agent.
Understanding Configuration Fields:
Before you begin, familiarize yourself with these key fields you'll use to define a trigger:
Agent: This specifies the agent that will be activated and perform an action when the trigger's conditions are met.Reply to: This defines the type of message creator (e.g., any user, a specific agent) whose message will activate the trigger.Interval(After X messages): This is a numerical input for the triggers unit, specifying how many Units (messages or time intervals) must occur before the trigger fires.Unit(After 10 X): Can be "messages" or a time interval such as "minutes", "hours", "days", "weeks", etc.Channel: This selects the specific conversation channel where the trigger will be active and monitor messages/events.
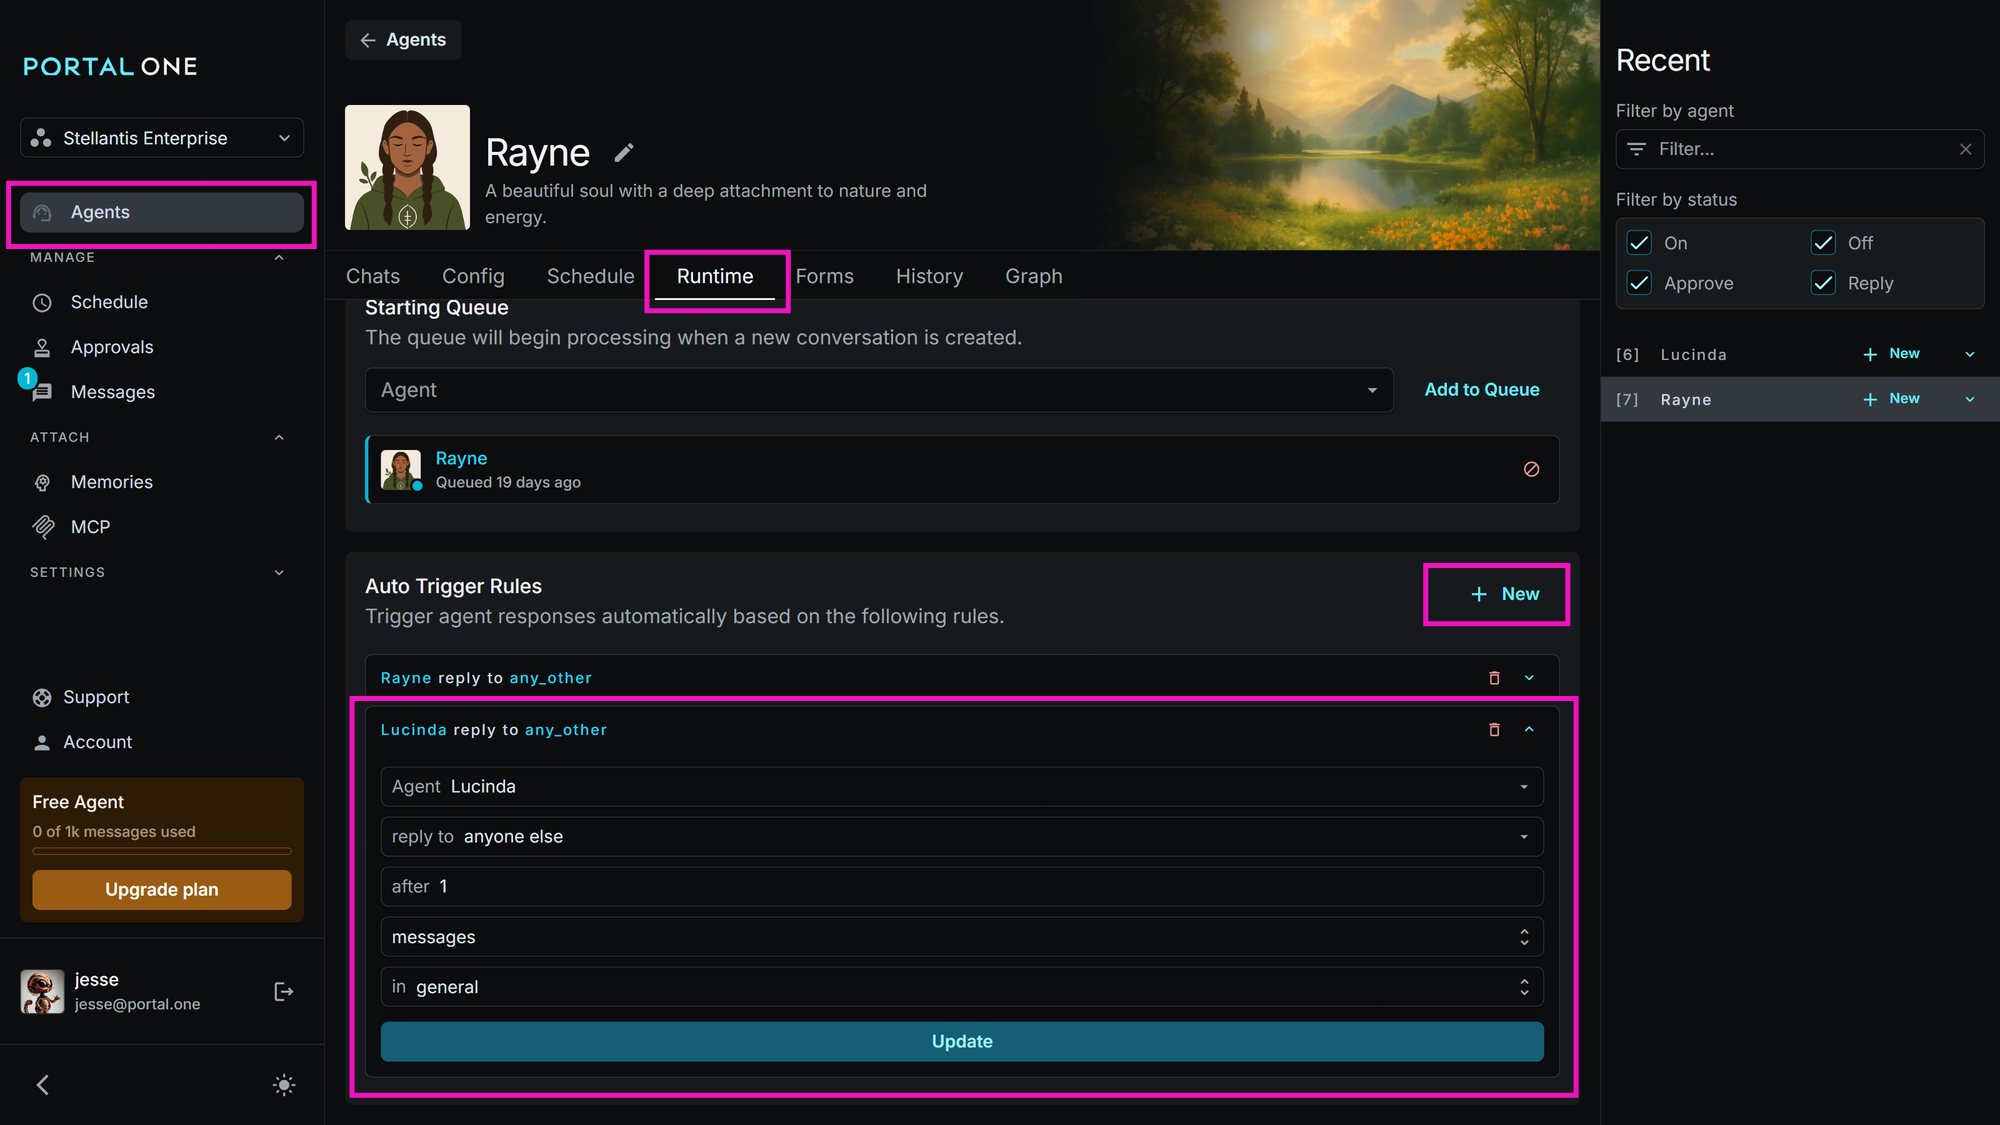
- Navigate to Agent Runtime Settings:
- Go to "Agents" from the main Portal One menu.
- Select the agent you wish to configure to open its details page.
- Click on the "Runtime" tab.
- Understanding the Runtime Tab:
- Starting Queue: This section (usually at the top) defines the initial sequence of agents that will process a new conversation.
- Auto Trigger Rules: This card is where you'll manage your Auto Reply Triggers.
- Adding a New Auto Reply Trigger:
- On the "Auto Trigger Rules" card, click the "+ New" button.
- A new accordion item will appear, representing your new trigger. It will display a human-readable summary of the trigger once configured.
- Configuring the Trigger:
Important Note: If multiple triggers' conditions are met by a single event, all matching triggers will fire in the order they are defined in the "Auto Trigger Rules" list. Be mindful of this sequence when designing complex interactions.
- Expand the new trigger's accordion item to reveal the configuration form.
- Fill in the fields as defined above (
Agent,Reply to,After X,Units,In channel). - Click "Update" at the bottom of the "Auto Trigger Rules" card to save your changes.
- Modifying Triggers in Active Chats:
While Runtime settings apply to new chats, these triggers can often be viewed and modified for an active conversation instance directly within the conversation view, offering dynamic control.
Best Practices & Pitfalls for Effective Auto Reply Triggers
- Clarity in Configuration: While triggers don't have custom names, the human-readable summary generated by the UI (e.g., "Lucinda reply to anyone else after 1 messages in general") serves as an identifier. Ensure your configuration clearly reflects the trigger's intended purpose and the chosen
Agenthas a descriptive name. - Order Matters: As noted, all matching triggers fire in the order they are listed. Review this order carefully to ensure predictable behavior and avoid redundant actions or user confusion.
- Start Simple, Test Incrementally: Implement one trigger at a time. Test its behavior thoroughly in a controlled chat environment before adding more complexity or deploying it in critical workflows.
- Avoid "Spammy" or Redundant Triggers: Be mindful of trigger frequency. Too many or too frequent automatic replies can be annoying or counterproductive. Design triggers to provide clear value.
- Prevent Unintended Loops: Ensure your trigger logic doesn't create scenarios where agents continuously trigger themselves or each other in an infinite loop. The system has some safeguards (e.g., an agent generally can't trigger itself directly in a simple loop), but complex multi-agent setups require careful planning.
- Consider the Triggered Agent's Full Scope: Remember the triggered agent acts based on its entire configuration (instructions, tools, Memories, etc.). Ensure this configuration aligns with the intended automated action.
- Use Channels for Specificity: For more complex scenarios with many potential triggers, use different Channels to isolate interaction flows. Apply specific triggers only to the relevant channels to prevent unintended overlaps and keep your automations organized.
- Think About Timing: For time-based triggers, consider what an appropriate idle period is for your use case. For message-count triggers, think about what frequency of intervention is helpful versus disruptive. Consider integrating with Scheduling for more complex timing needs outside of direct conversational replies.
Conclusion: Orchestrate Dynamic AI Interactions
Auto Reply Triggers are a cornerstone of creating truly interactive and automated AI experiences in Portal One. By thoughtfully configuring when and how your agents respond, you can significantly enhance their efficiency, manage conversation flow effectively, and build sophisticated, proactive AI solutions.
Common applications include:
- Instantaneous Host Agent replies for engaging conversations.
- Periodic Summarizer Agents to create and store summaries.
- Automated Reviewer Agents for quality assurance or managing idle chats.
By mastering Auto Reply Triggers, you empower your agents to become more autonomous and valuable members of your digital workforce. We encourage you to explore this feature and see how it can transform your Portal One workflows.