Basic Agent Scheduling: Automating Your First Task
Automate AI agents with Portal One's basic scheduling. This guide shows how to set recurring tasks, configure frequency & start times, and make agents proactive.
Want your AI Agents to work for you automatically? Portal One's scheduling feature lets you set up your agents to perform tasks at specific times or regular intervals. This guide will walk you through scheduling an agent for a simple, recurring task.
For this example, let's imagine you have an agent designed to send a "Good morning" message to @Owner (or another designated contact) each day.
Prerequisites:
- You have already created an AI Agent. (If not, please see the "Creating Your First Simple Agent & Task" guide first).
- The agent you want to schedule is configured with the instructions it needs to perform its task (e.g., it knows to send a "Good morning" message and how to mention
@Owner). Scheduling only triggers the agent; it doesn't define its core behavior or provide dynamic inputs directly.
Step 1: Navigate to Your Agent's Schedule Tab
- From the main navigation sidebar (located on the left side of your Portal One dashboard), click on the "Agents" menu item.
- Find and click on the Agent you wish to schedule from your list of agents. This will take you to the Agent Details page for that specific agent.
- On the Agent Details page, you'll see several tabs (Chats, Config, Schedule, etc.). Click on the "Schedule" tab. If this is the first time scheduling this agent, this tab will likely be empty except for a button to create a new schedule.
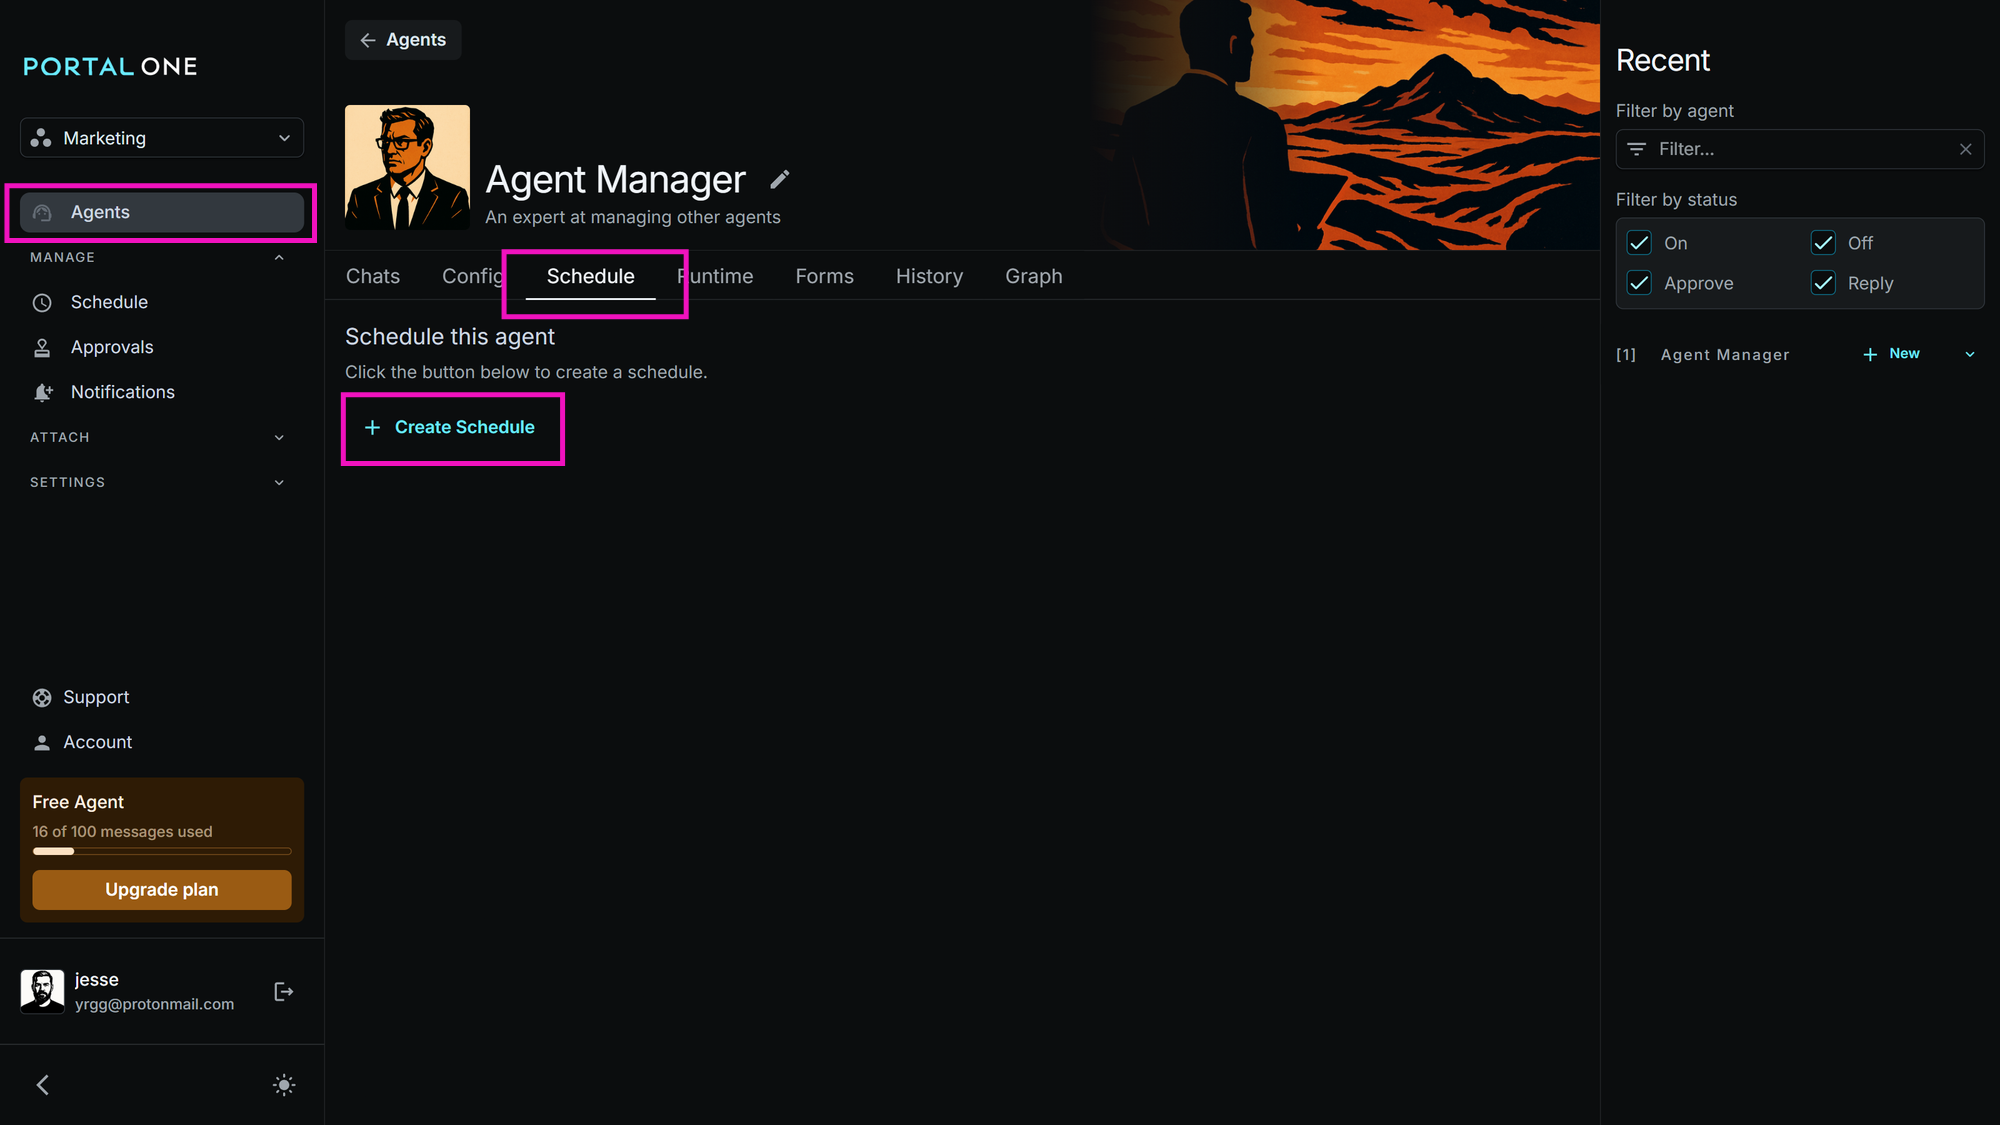
Step 2: Create a New Schedule
- On the "Schedule" tab for your agent, click the "+ Create Schedule" button
- This will open the "Configure Schedule" dialog box.
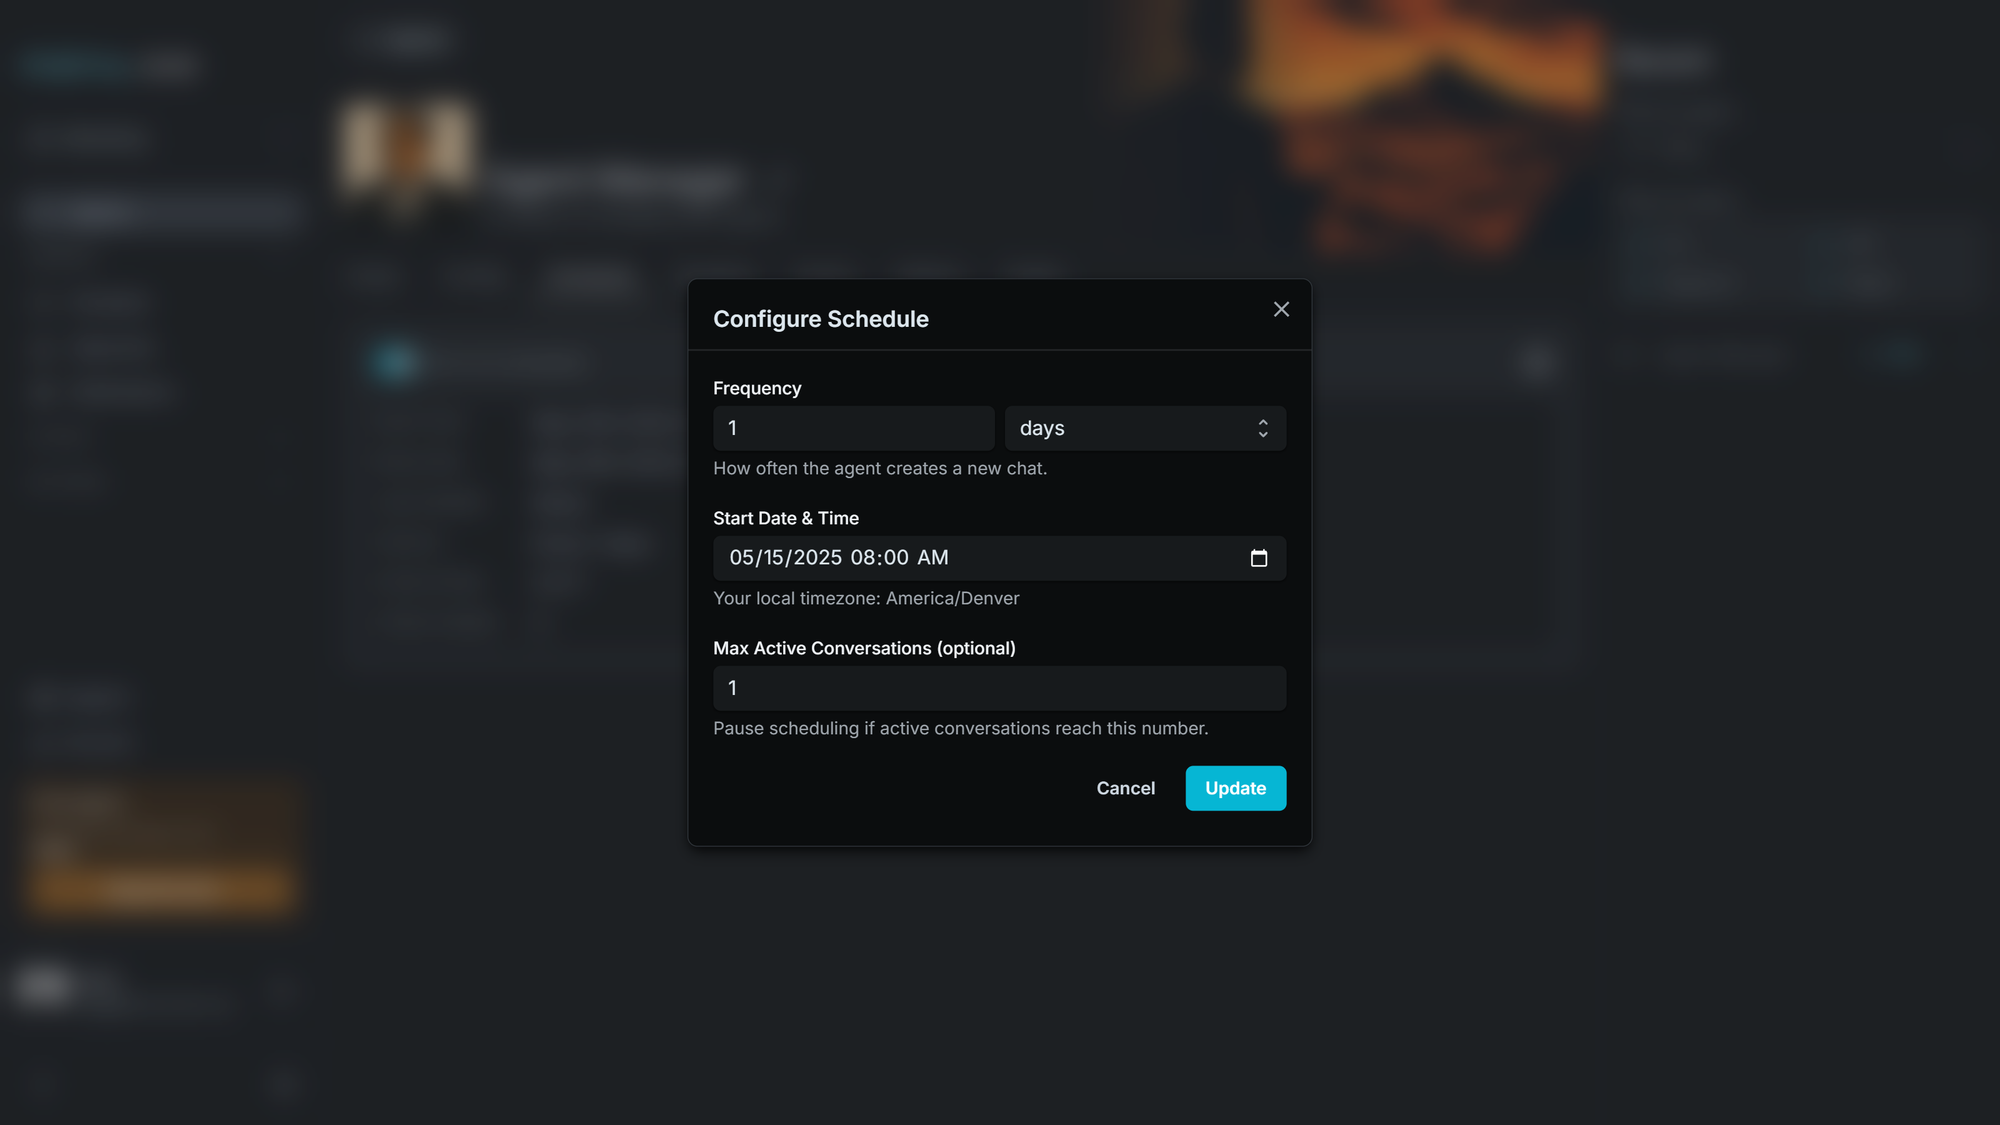
Step 3: Configure the Schedule Details
Now, let's set up our "Good morning" agent to run every morning.
- Frequency & Unit: This determines how often the task repeats.
- In the "Frequency" field, enter
1. - In the "Unit" dropdown menu, select
Days. - (This configuration tells Portal One to run the agent once every day.)
- In the "Frequency" field, enter
- Start Date & Time: This sets the initial date and time for the first execution.
- Start Date: Select today's date or the specific date you want the schedule to begin.
- Start Time: Enter the time you want the agent to run. For our "Good morning" message, you might choose
08:00 AM.
- Timezone Note:
- Portal One automatically attempts to detect your local timezone based on your web browser's settings.
- Important: Ensure your computer's timezone is set correctly, as all scheduled tasks will run according to this detected timezone.
- Max Active Conversations (Optional):
- This setting limits how many instances of this agent's scheduled task can run simultaneously (concurrently).
- For simple, non-overlapping tasks like our daily "Good morning" message, you can typically leave this blank or set it to
1. We'll cover advanced use cases for this in other guides.
- Click the "Submit" button to save your schedule configuration.
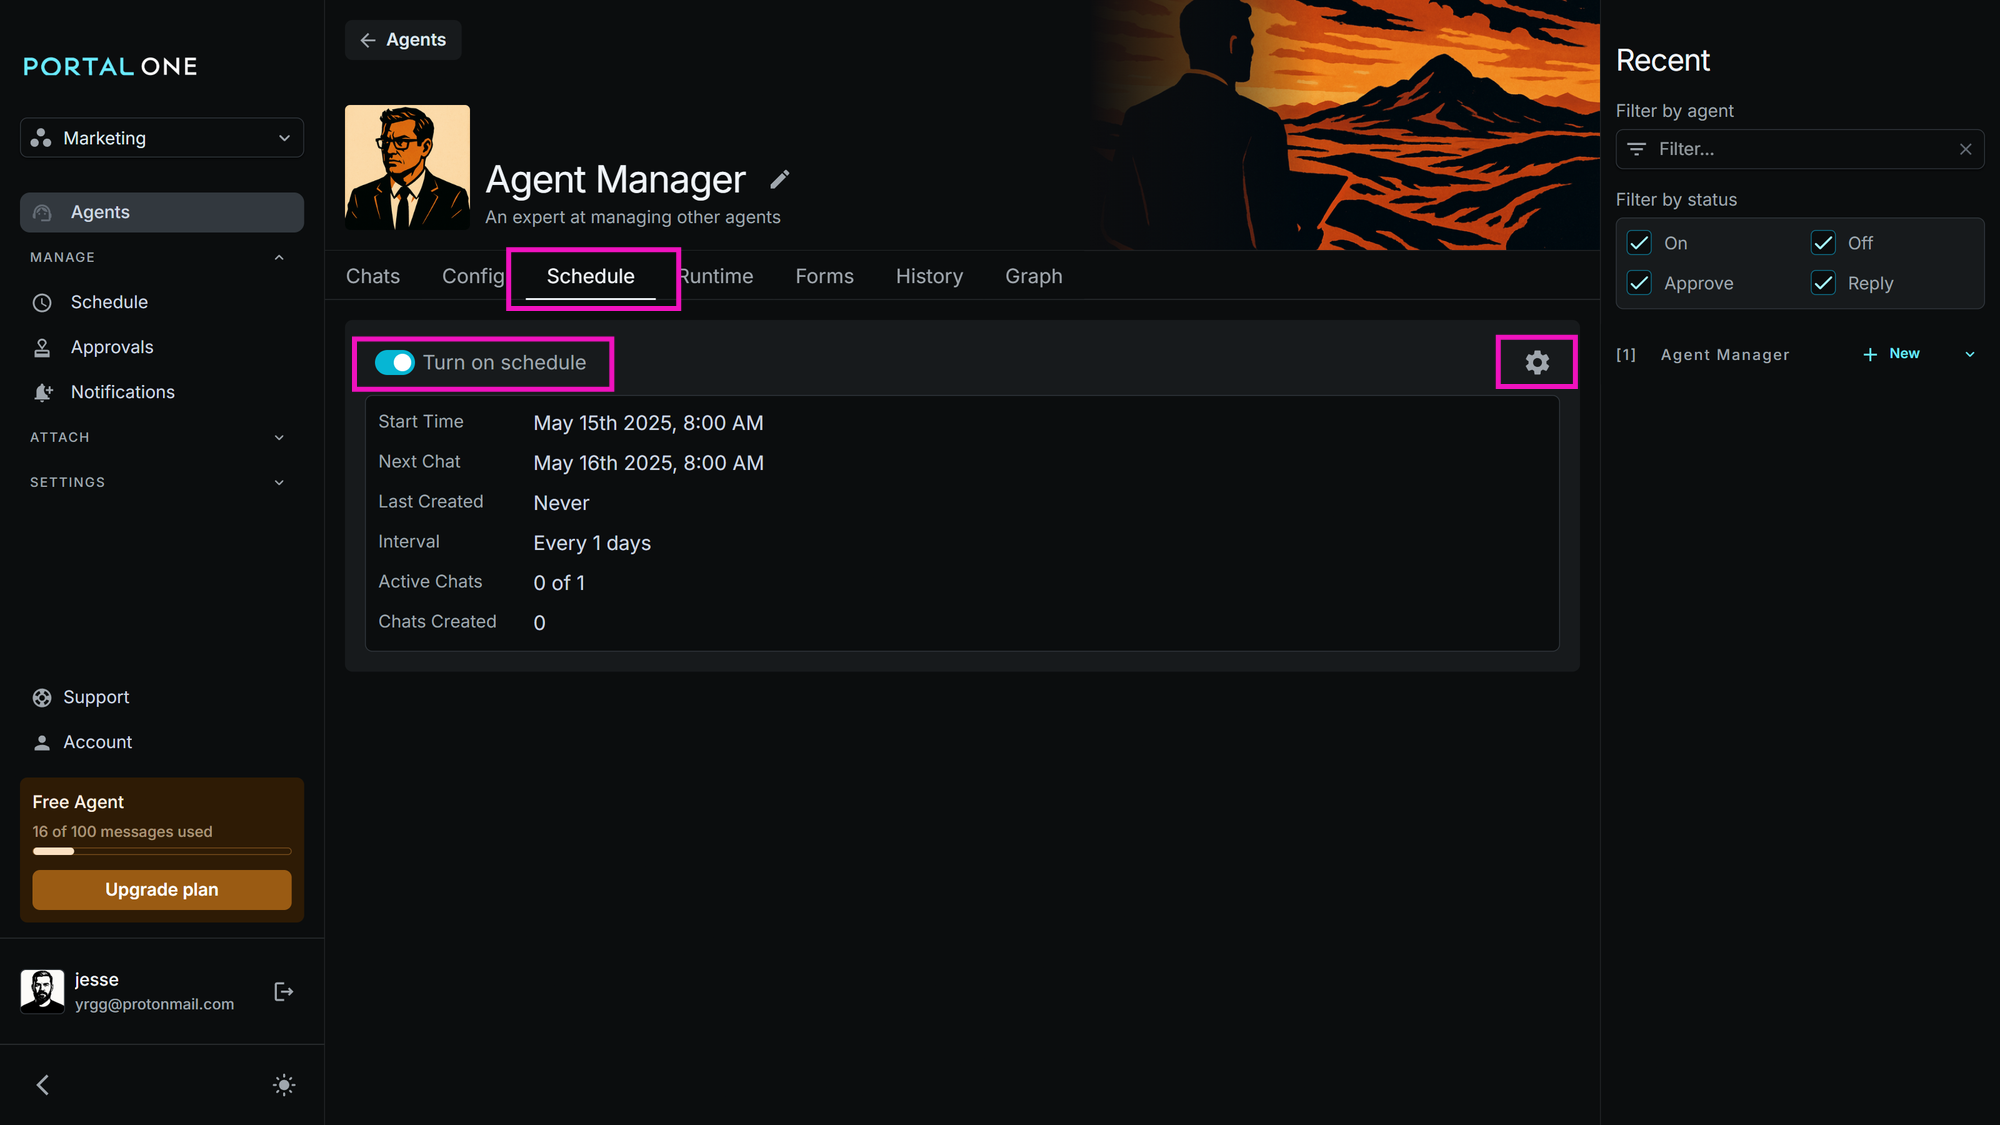
Step 4: Review the Schedule Card
After clicking "Submit," the "Configure Schedule" dialog will close. You'll now see a new schedule card appear on the agent's "Schedule" tab.
This card provides a summary and controls for your new schedule:
- A status toggle switch (disabled by default – ensure it is set to "on" or "enabled" for the schedule to run).
- An edit button (a gear icon) that reopens the "Configure Schedule" dialog if you need to make changes.
- Metadata:
- Start Time: The initial date and time you set.
- Next Chat: Shows the date and time of the next scheduled run.
- Last Chat: Shows when the agent last ran via this schedule (will be blank initially).
- Interval: Displays the configured frequency (e.g., "every 1 Day").
- Active Chats: Shows current concurrent executions (relevant if
Max Active Conversationsis used). - Chats Created: A count of how many times this schedule has successfully triggered the agent.
Your agent is now scheduled!
Step 5: Viewing Your Scheduled Agent in the Main Schedule View
Portal One provides a central dashboard to see all your upcoming scheduled events across all agents.
- In the main navigation sidebar (on the left), click on "Schedule".
- This page displays:
- Upcoming scheduled events, typically for the next 24 hours (Daily view) or the next 7 days (Grouped by day view).
- By default, it shows enabled scheduled items. You have the option to filter or view disabled schedules.
- You should see your newly scheduled agent listed here. Each item in this view typically shows:
- The agent's avatar and name (clicking the name often links back to the Agent Details > Schedule tab).
- The specific time the event will occur.
- A gear icon (or similar edit icon) to open the "Configure Schedule" dialog for that agent's schedule directly.
- A switch to quickly enable or disable this specific scheduled event for the agent without deleting the schedule configuration.

Important Note on Agent Inputs for Scheduled Tasks:
The scheduling feature in Portal One triggers your agent at the specified time. It does not directly provide dynamic inputs (like a daily news URL or specific customer query) to the agent as part of the schedule configuration.
If your agent requires specific information to perform its task each time it runs (e.g., a URL to summarize, a topic to research), the agent itself must be designed to:
- Perform a default action if no new input is given.
- Or, more commonly, be configured to proactively request this information from a designated contact (e.g., by sending a notification to
@Owneror@Managerand asking for the day's instructions or data).
What Happens Next?
At 8:00 AM (or your specified time) each day, Portal One will automatically trigger your agent. The agent will then execute its pre-configured instructions (e.g., sending a "Good morning" message to @Owner).
Congratulations! You've successfully scheduled your first AI agent task in Portal One.