Human Oversight: Reviewing Agent Actions
Learn how Portal One's Human Oversight puts you in control. Review, approve, or reject AI agent actions & MCP tool calls. Ensure quality & compliance.
Portal One puts you in command. Beyond the Pings & Notifications agents use to get your attention for conversational input (which you learned about in the previous guide on "Understanding Agent Pings & Notifications"), a crucial aspect of maintaining control is Human Oversight for agent actions. This means you review and approve specific actions an agent wants to take, especially when it involves using powerful tools, before they are executed. This ensures quality, compliance, and trust in your AI operations.
While Pings & Notifications alert you to check an agent's conversation for clarifications or updates, Action Approvals (the focus of this guide) are specifically about authorizing an agent's use of MCP (Model Context Protocol) tools to interact with other services, data, or perform significant operations.
How Action Approvals Work: The Core Loop
Understanding the approval process for actions is key:
- Agent Proposes an Action: An agent, performing its tasks, decides to use a configured MCP tool.
- Request Queued for Review: Instead of immediate execution, a request for approval is created and sent to the "Approvals" queue.
- You Get Notified: A visual indicator (badge count) appears on the "Approvals" navigation link. In agent chats, a "tool call" card will show the pending action.
- You Review & Decide: Navigate to the "Approvals" view, inspect the details, and then approve or reject the proposed action.
- Action Proceeds or Halts:
- Approved: The tool call executes, results return to the agent, and it continues.
- Rejected: The rejection (and any reason you provide) returns to the agent, allowing it to adjust.
Example Scenario: Approving Your First Agent Action
Let's walk through a common scenario. Your agent will list other agents, then ping you to check the conversation for its request for input, before finally getting details for a specific agent using a tool that requires Action Approval.
Prerequisites:
- You have an agent created in Portal One.
- You've connected to the Portal One MCP Server:
- Go to "MCP Connections," select the "Portal One MCP Server."
- Click "Authorize" to connect to the Portal One MCP Server.
Step 1: Configure Your Agent with Tools & Contacts
- Select your agent and go to its "Config" tab.
- Ensure the "Portal One MCP Server" is listed as a connected server.
- From the available tools, add
list_agentsandget_agentto this agent. - In the "Contacts" section of the agent's config, ensure
@Owner(or your user) is added so the agent can ping you.
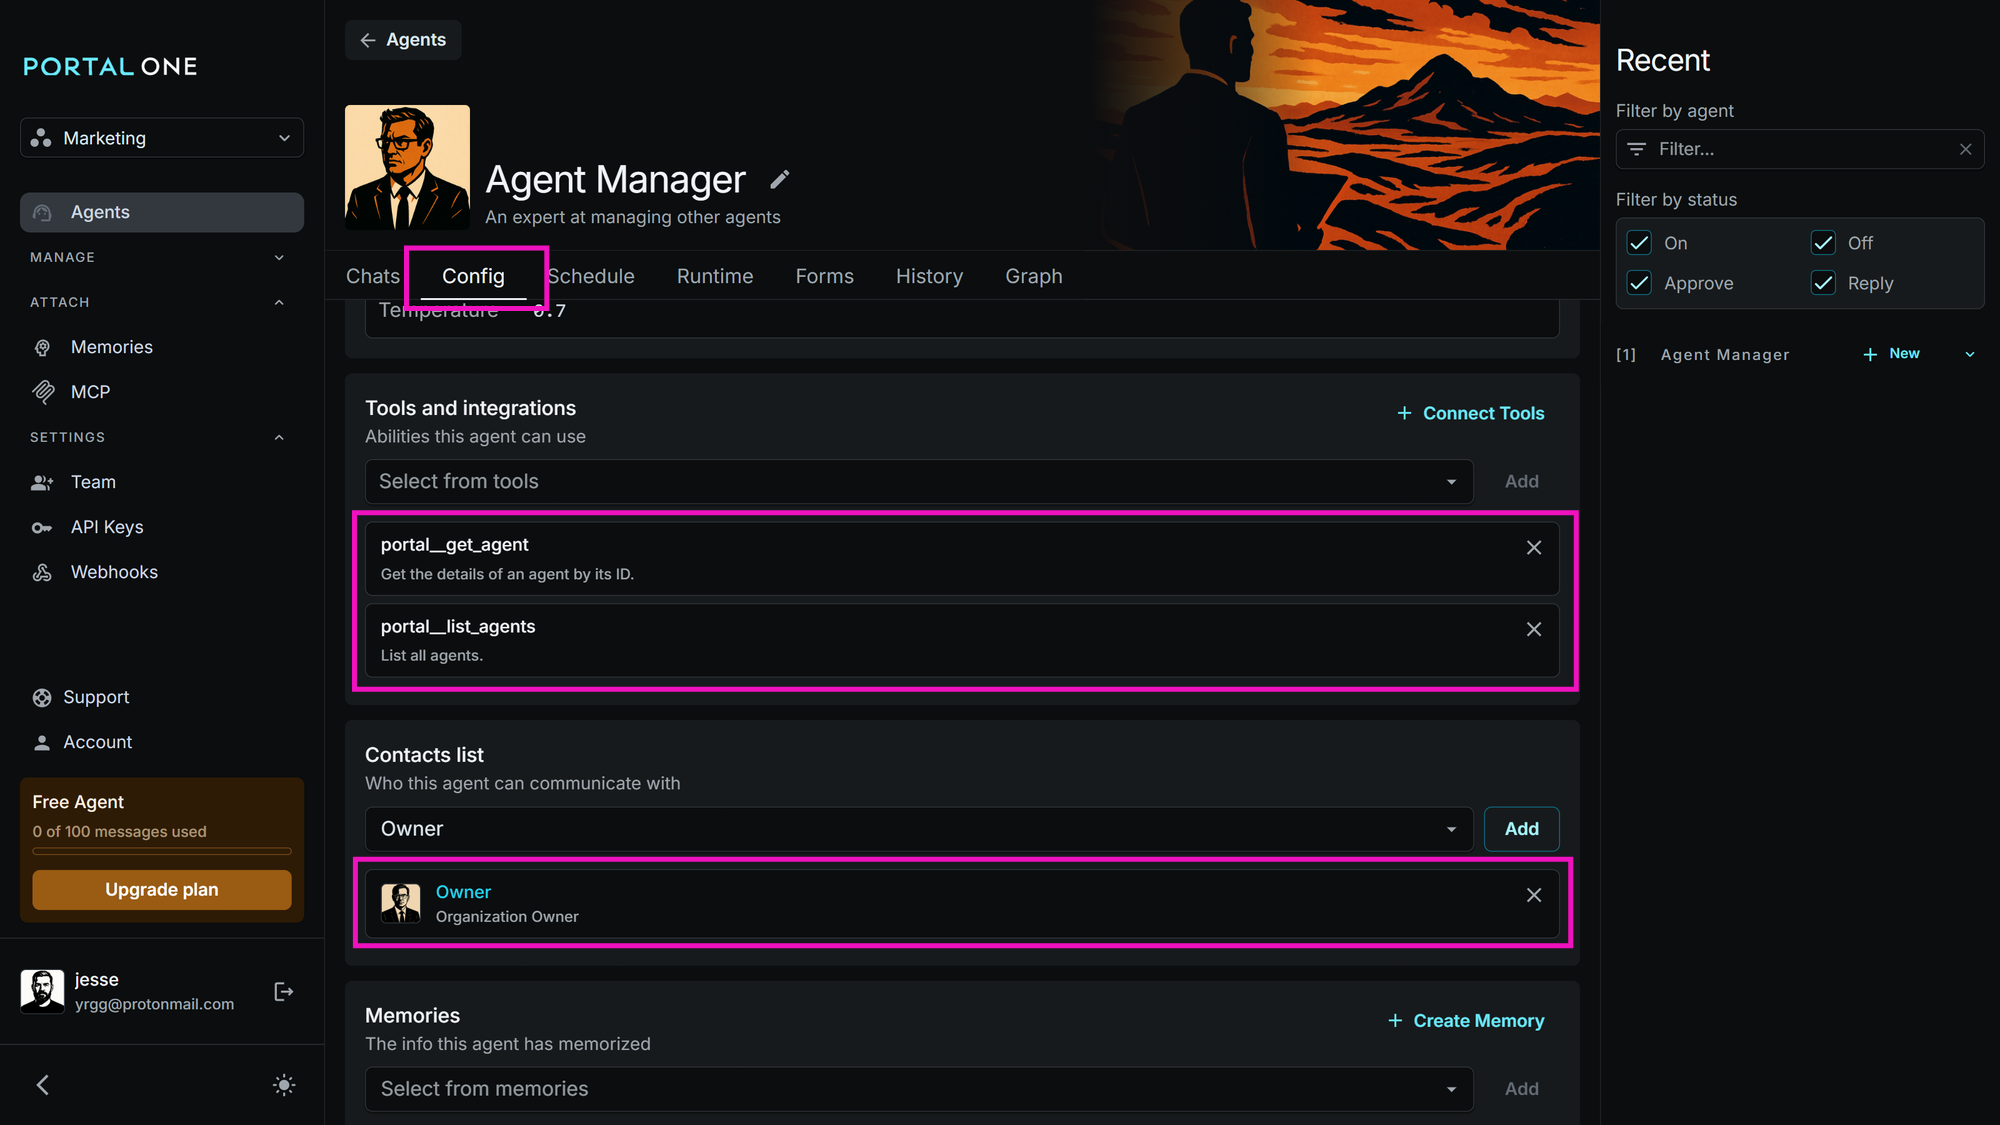
get_agent and list_agents tool from our configured Portal One MCP server.Step 2: Instruct Your Agent
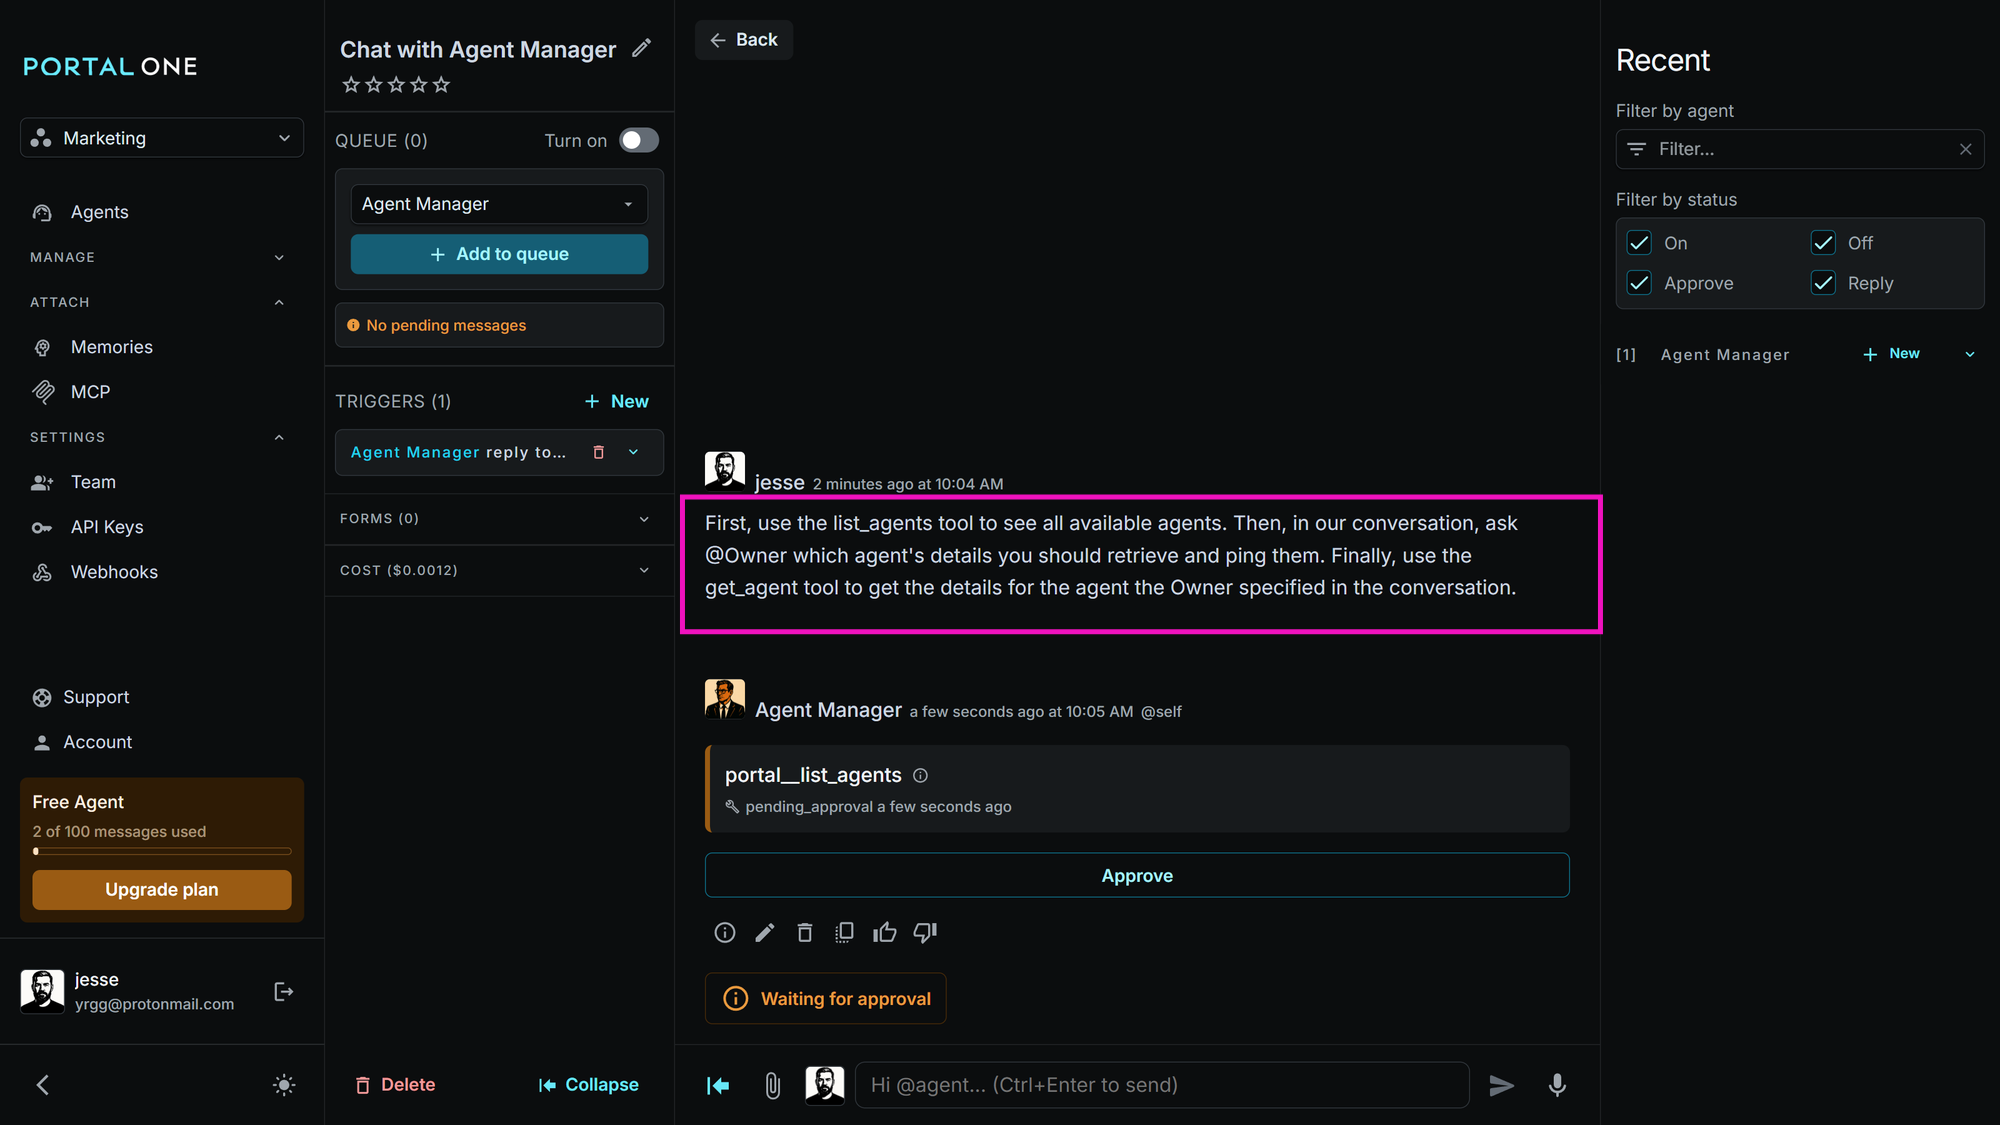
- In the agent's "System Prompt" or by chatting directly with it, provide the following instruction:
"First, use thelist_agentstool to see all available agents. Then, in our conversation, ask @Owner which agent's details you should retrieve and ping them. Finally, use theget_agenttool to get the details for the agent the Owner specified in the conversation."
Step 3: Trigger the First Action & See Approval Request
- Initiate a conversation with your agent based on the instruction above.
- When the agent attempts to use the
list_agentstool, you'll see:- A "tool call" card in the chat interface for
list_agents, showing its status as "Pending Approval." - A notification badge will appear next to the "Approvals" link in the main navigation pane.
- A "tool call" card in the chat interface for
Step 4: Review and Approve the First Action
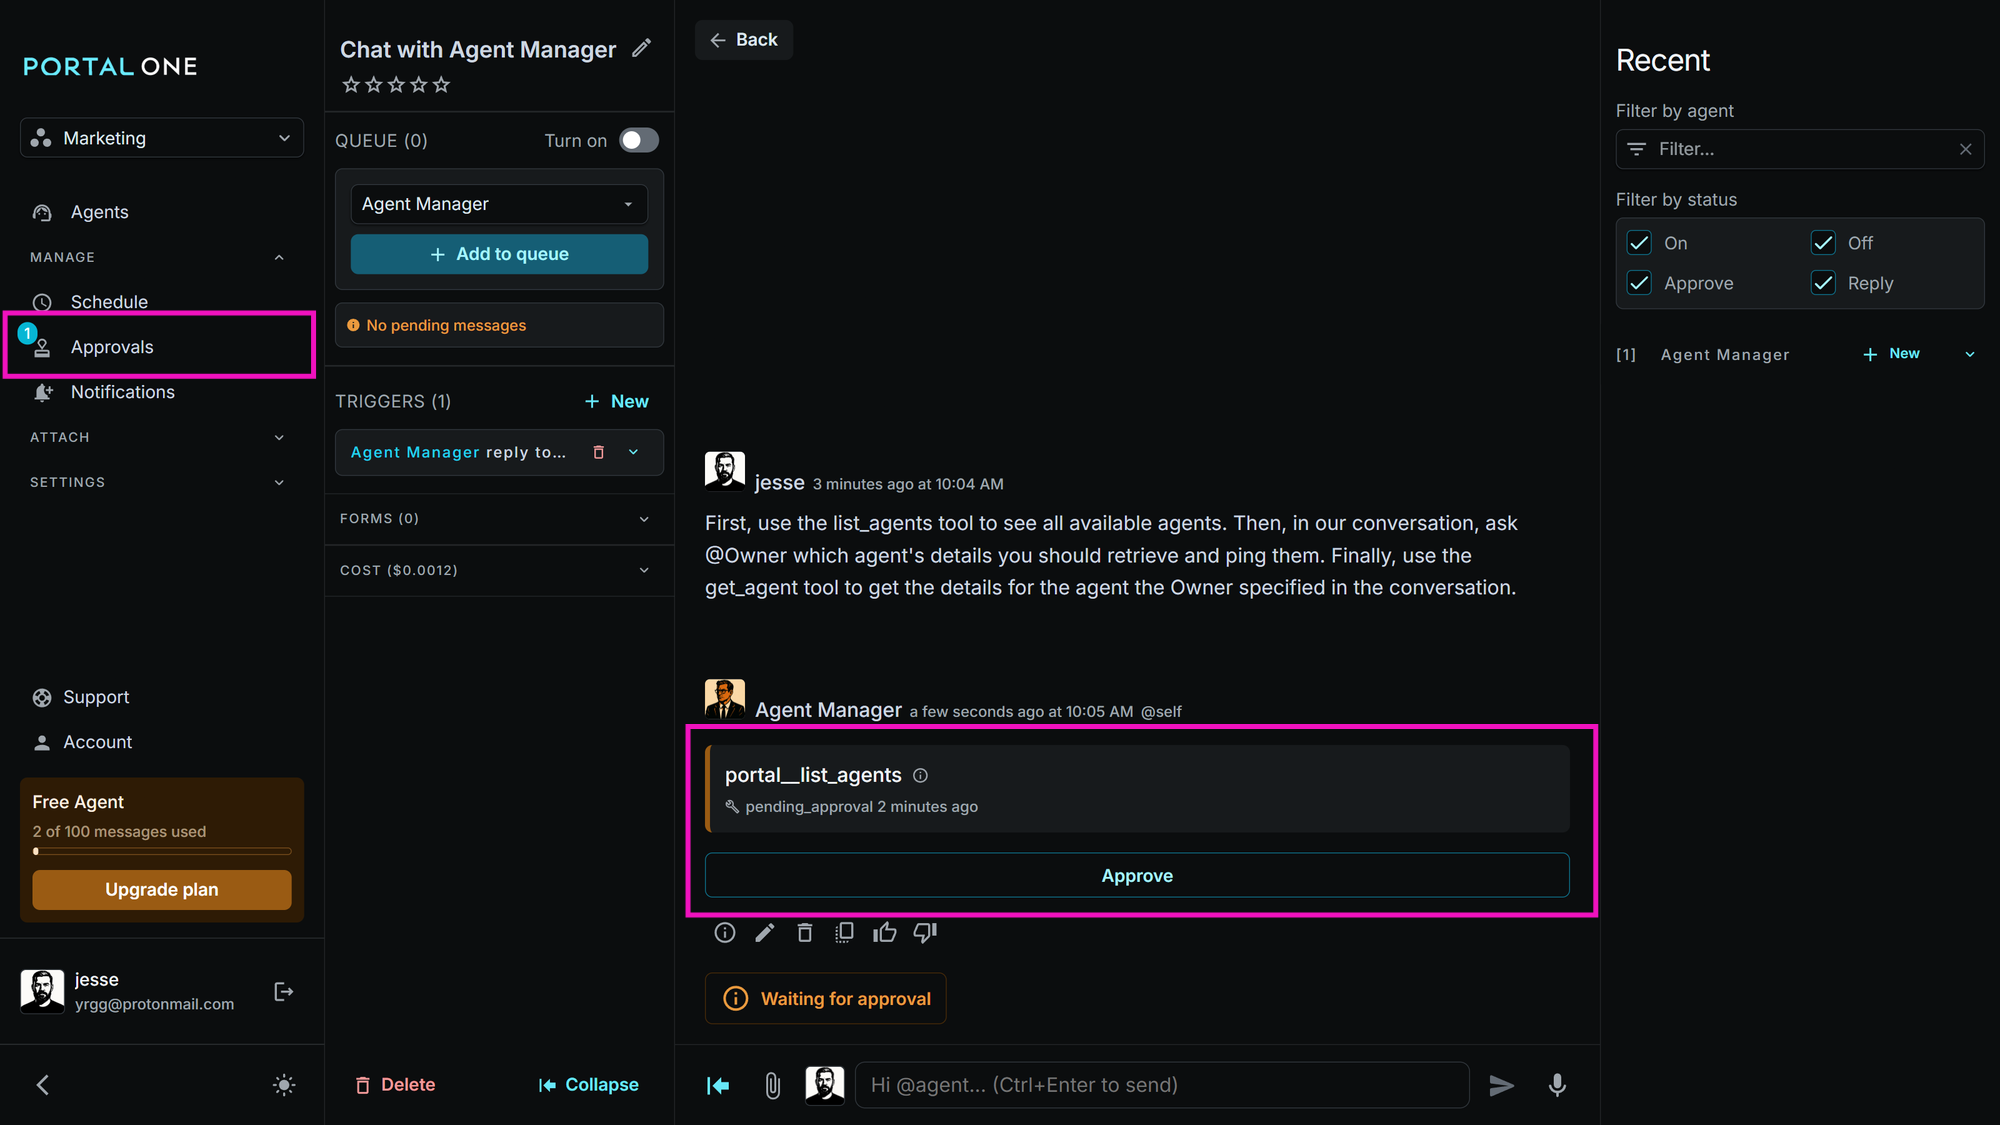
- Navigate to the "Approvals" view.
- Find the
list_agentsrequest, inspect it, and approve it. - The agent will then receive the list of agents. As per its instructions, it will post a message in the conversation asking
@Ownerfor the next step and trigger a Ping.
Step 5: Receive Ping, Respond in Conversation & Trigger Second Approval
- You'll receive a Notification (as learned in the previous guide) alerting you that the agent requires your attention.
- Go to your "Notifications" view, note the ping, and then navigate to the conversation with the agent.
- In the conversation, you'll see the agent's question (e.g., "Okay, I have the list of agents. Which one should I get details for?").
- Reply in the conversation, specifying an agent name.
- The agent will then attempt to use the
get_agenttool with the name you provided. This will trigger another Action Approval request for theget_agenttool. Review and approve this as well.
This scenario demonstrates how agents can combine Pings/Notifications to draw your attention to their conversation for clarification, with Action Approvals for executing powerful tools.

@Owner which causes the notification to appear in the Notifications view and a badge to appear next to the Notifications link.Navigating the Approvals View
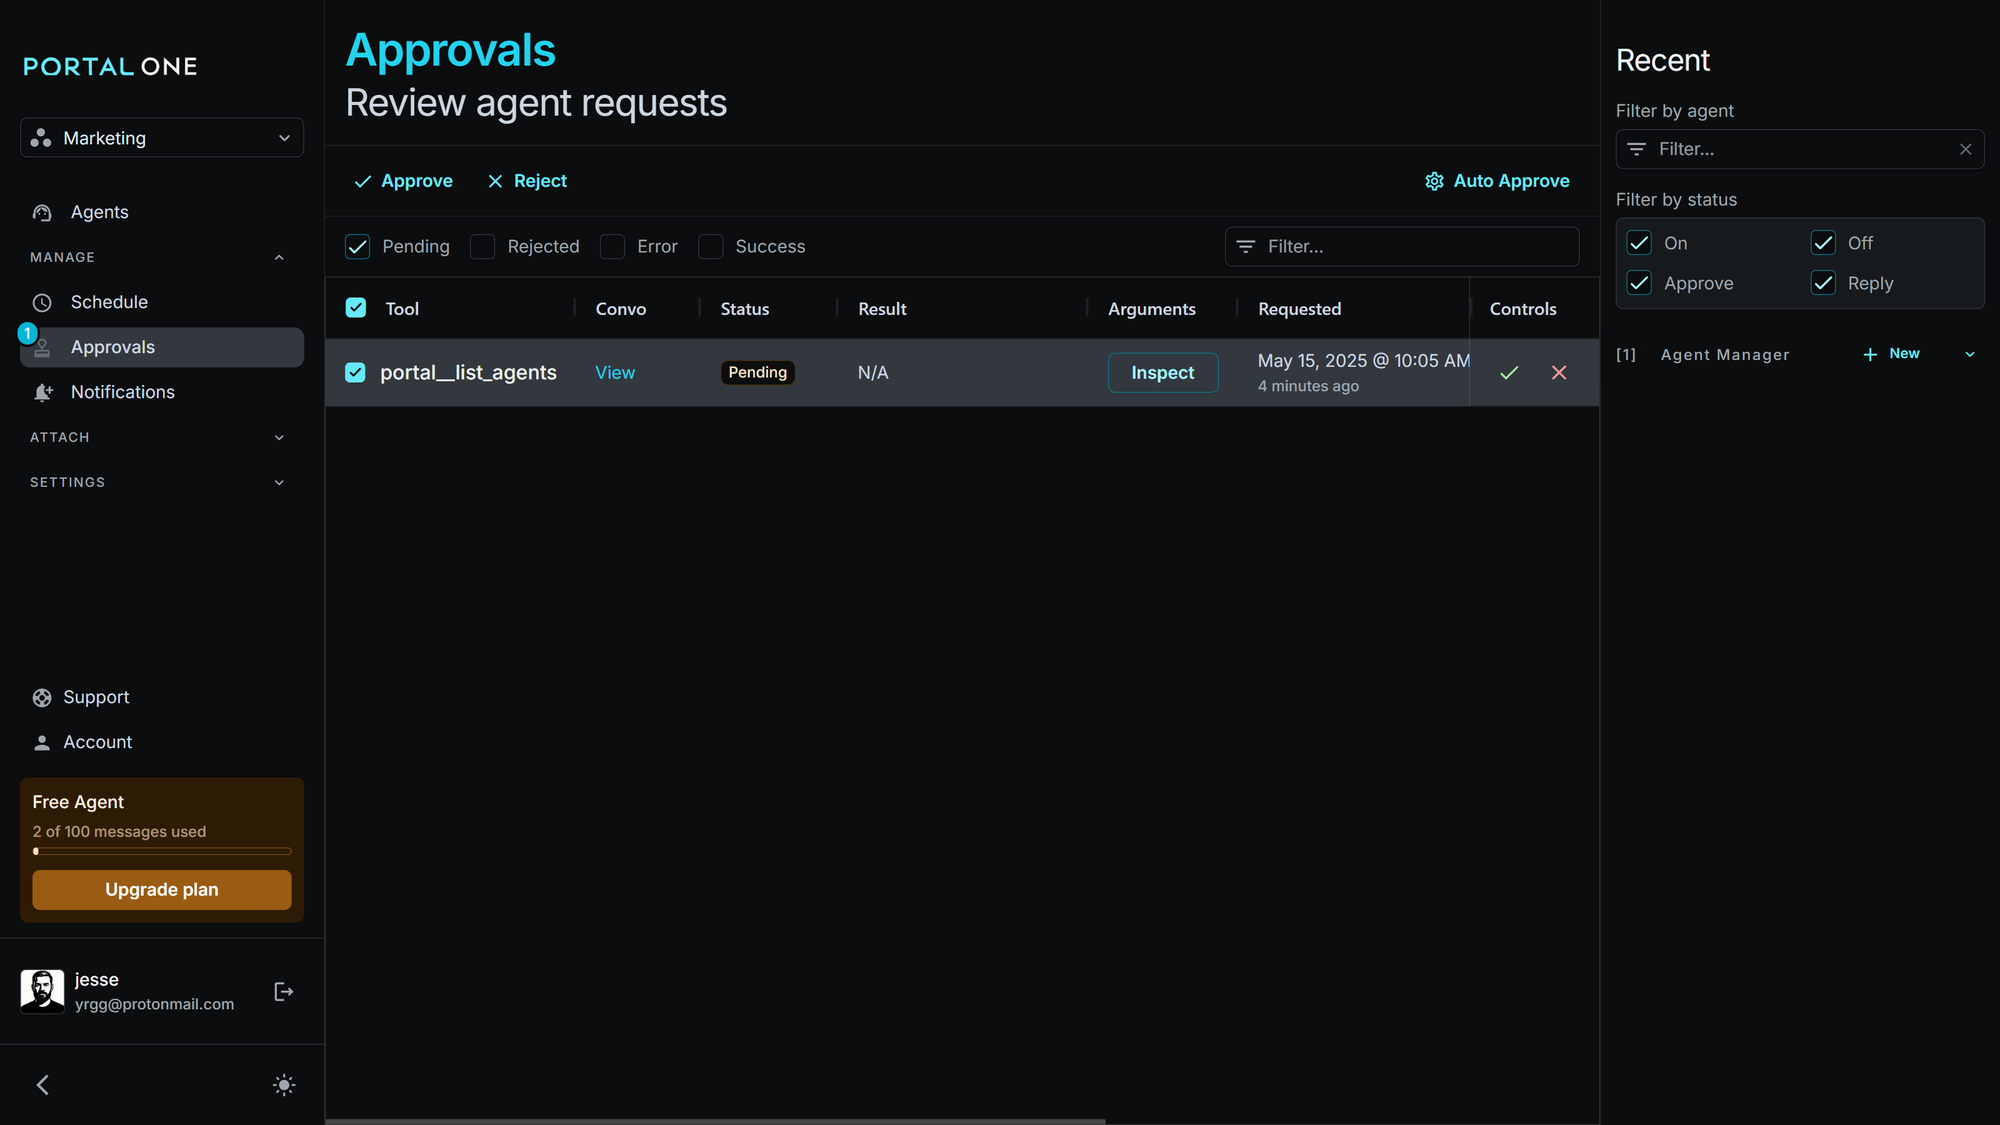
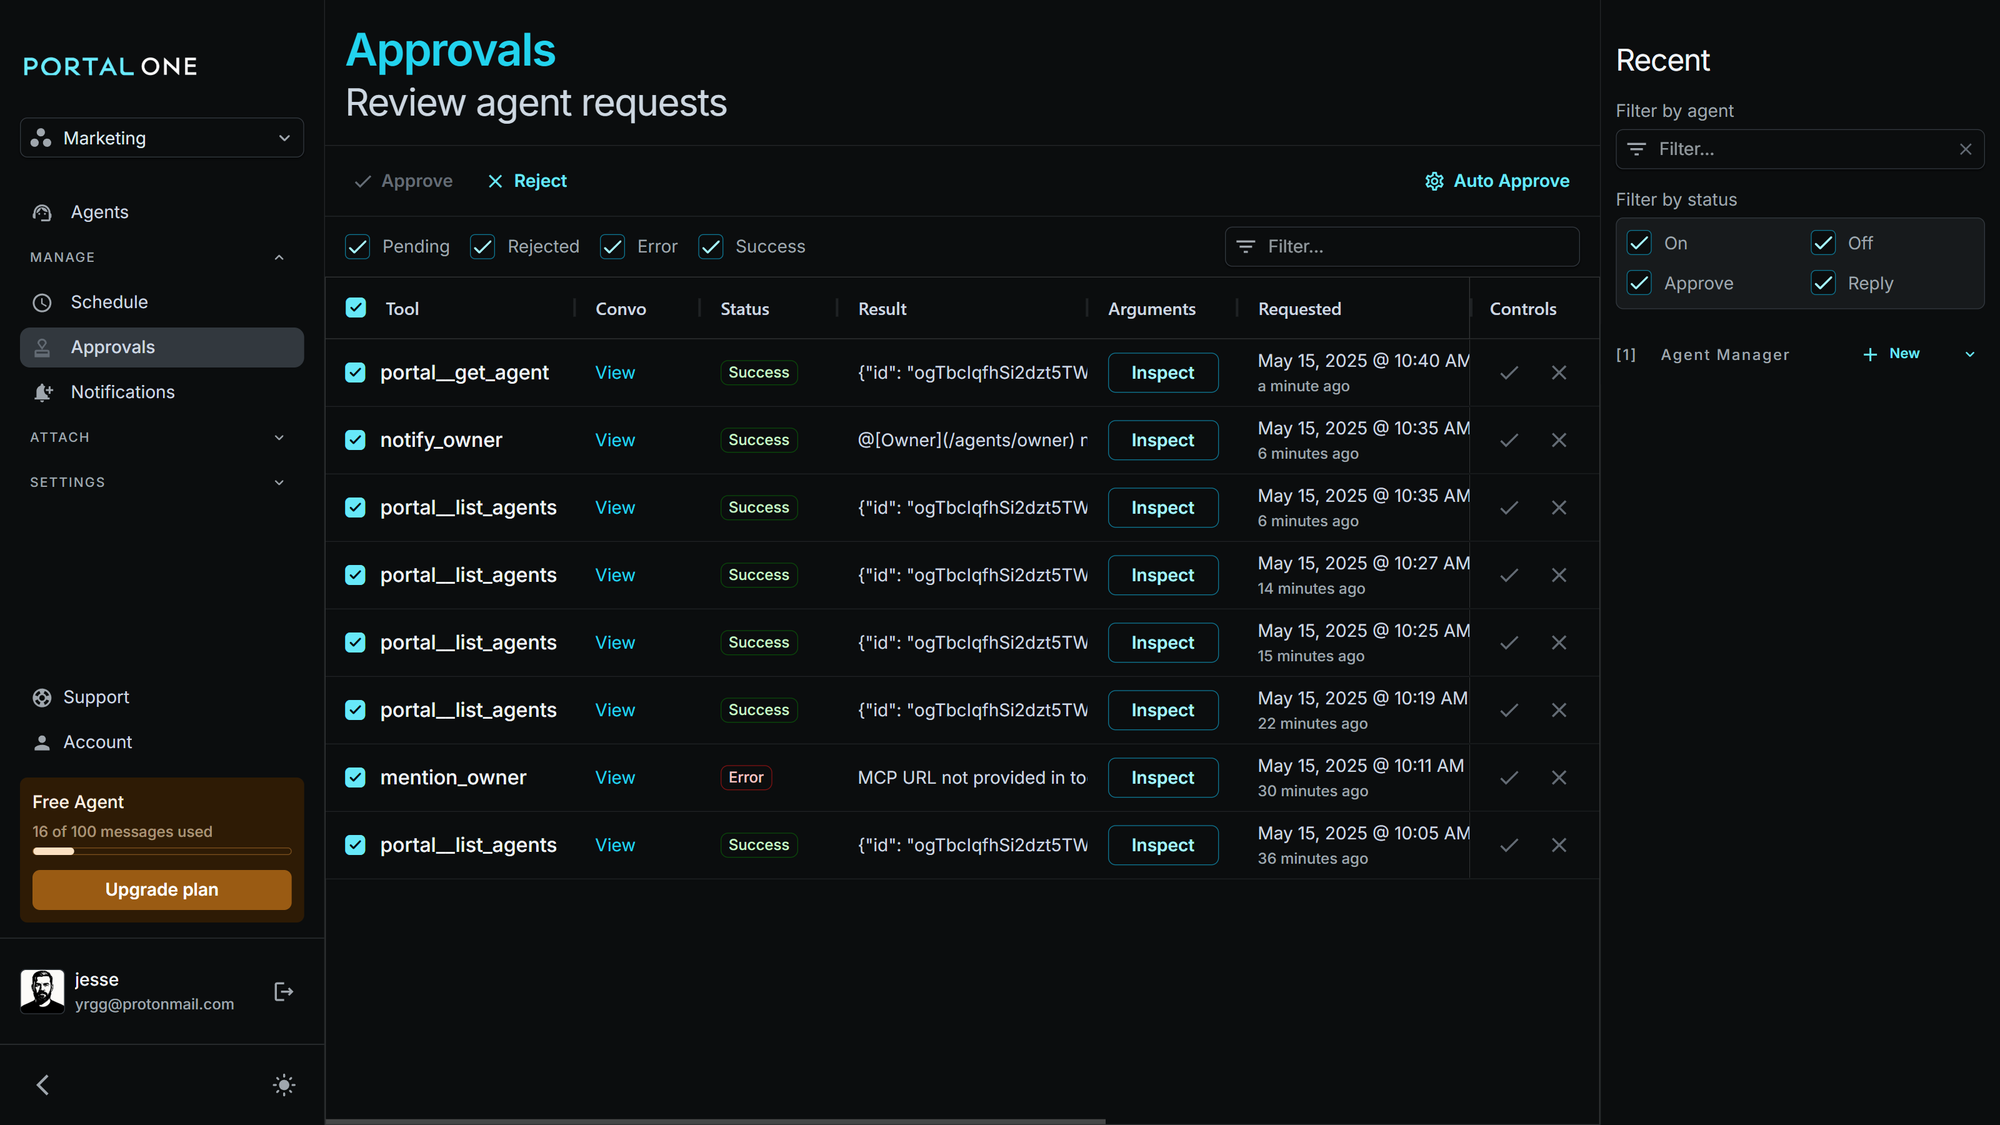
When you click the "Approvals" link in the navigation pane, you're taken to the Approvals page. This is your central hub for managing all pending and past action requests.
- Approvals Table: Displays a list of all action requests. Key columns include:
- Tool Name: The MCP tool the agent wants to use (e.g.,
list_agents). - Tool Arguments: The specific parameters the agent intends to use with the tool.
- Agent: The agent requesting the action.
- Timestamps: When the request was made, approved, etc.
- Status: Pending, Approved, Rejected, Success, Error.
- Approved By: User who approved/rejected the action.
- Tool Name: The MCP tool the agent wants to use (e.g.,
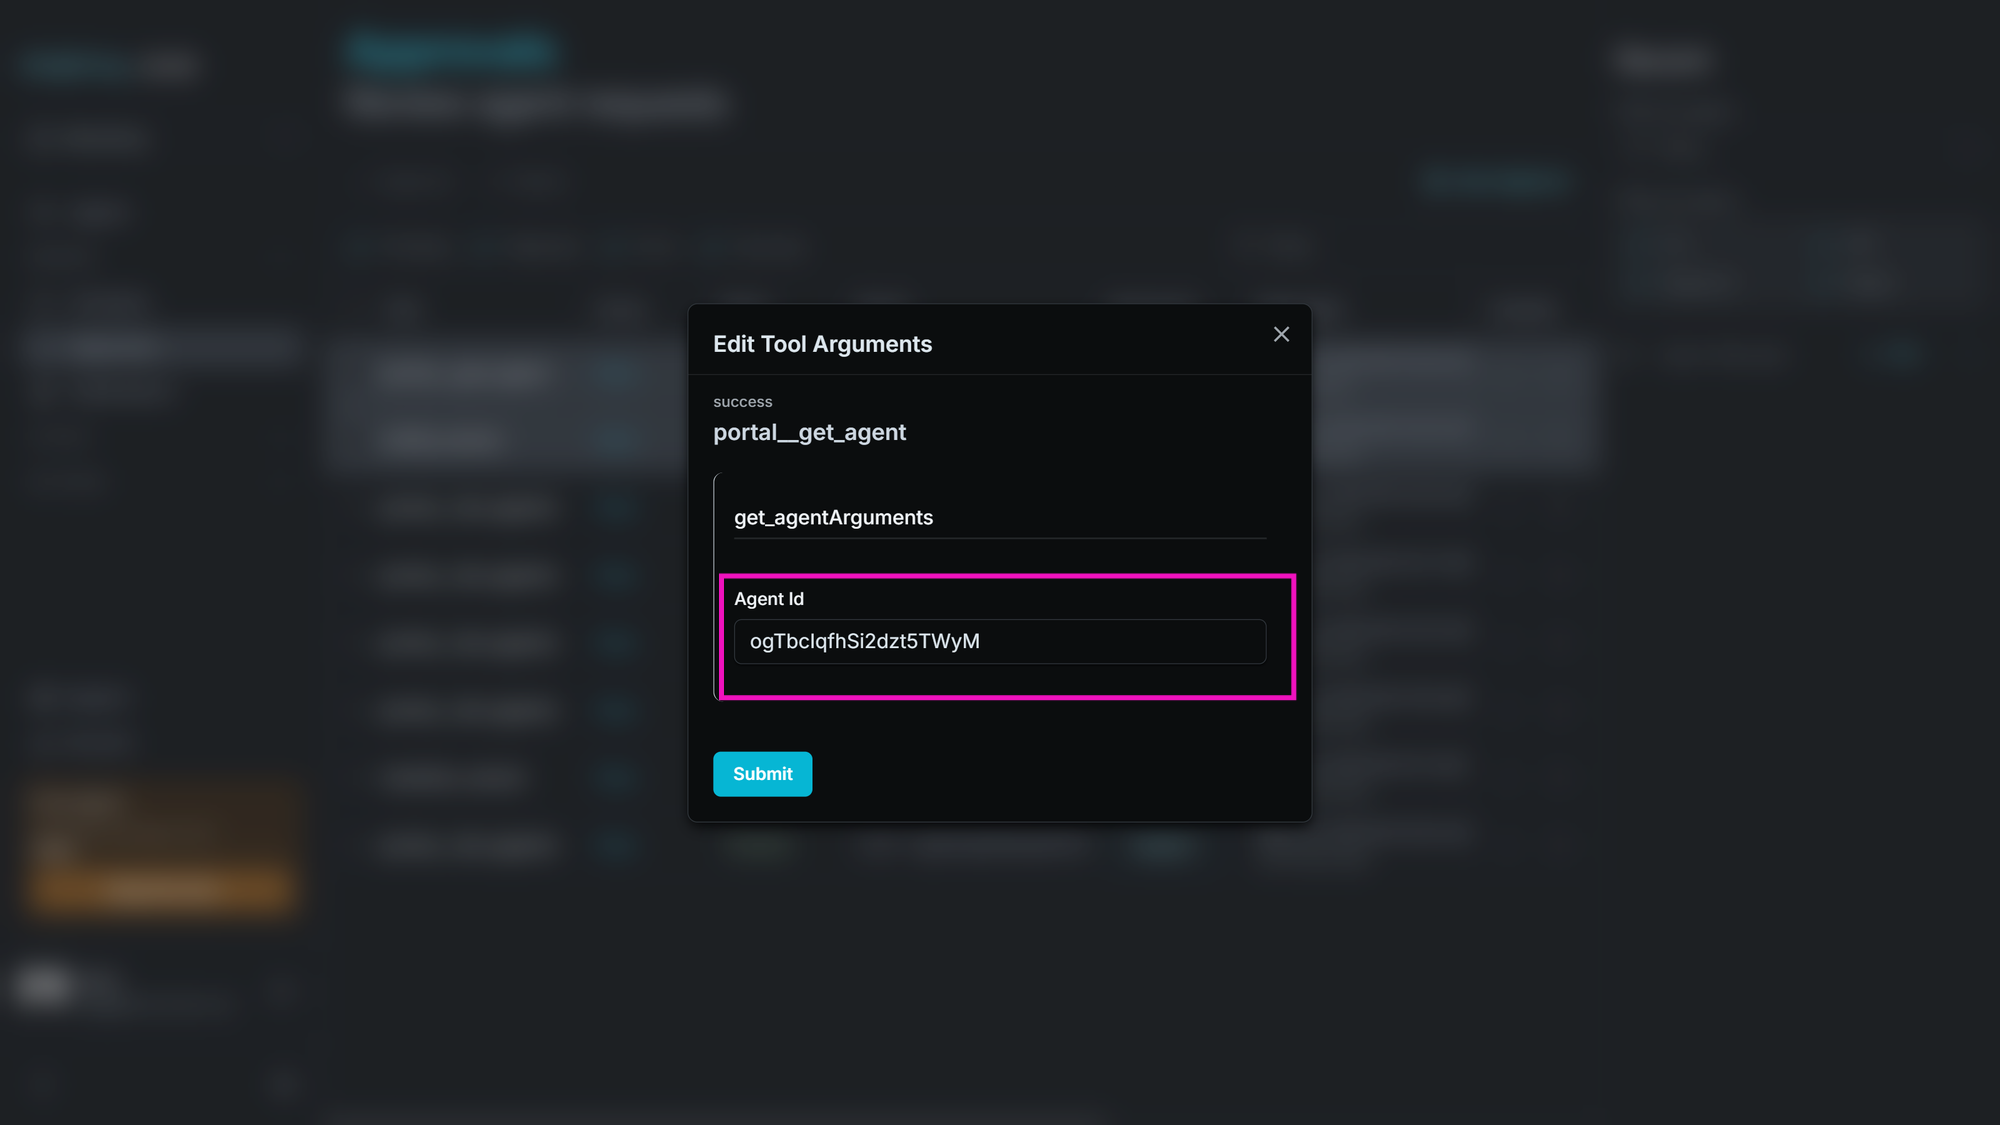
Inspecting and Modifying Actions
For a detailed look or to make adjustments before approval:
- Find the pending action row in the Approvals table.
- Click the "Inspect" button (or similar icon) for that row.
- A dialog will open, showing a form with the proposed Tool Arguments (e.g., for an email tool, this would be subject, body, recipient).
- Review these arguments carefully.
- Modify (Optional): You can directly edit the arguments in the form if needed (e.g., correct a typo, change a parameter). This gives you fine-grained control.
- Click "Submit" in the dialog if you made changes.
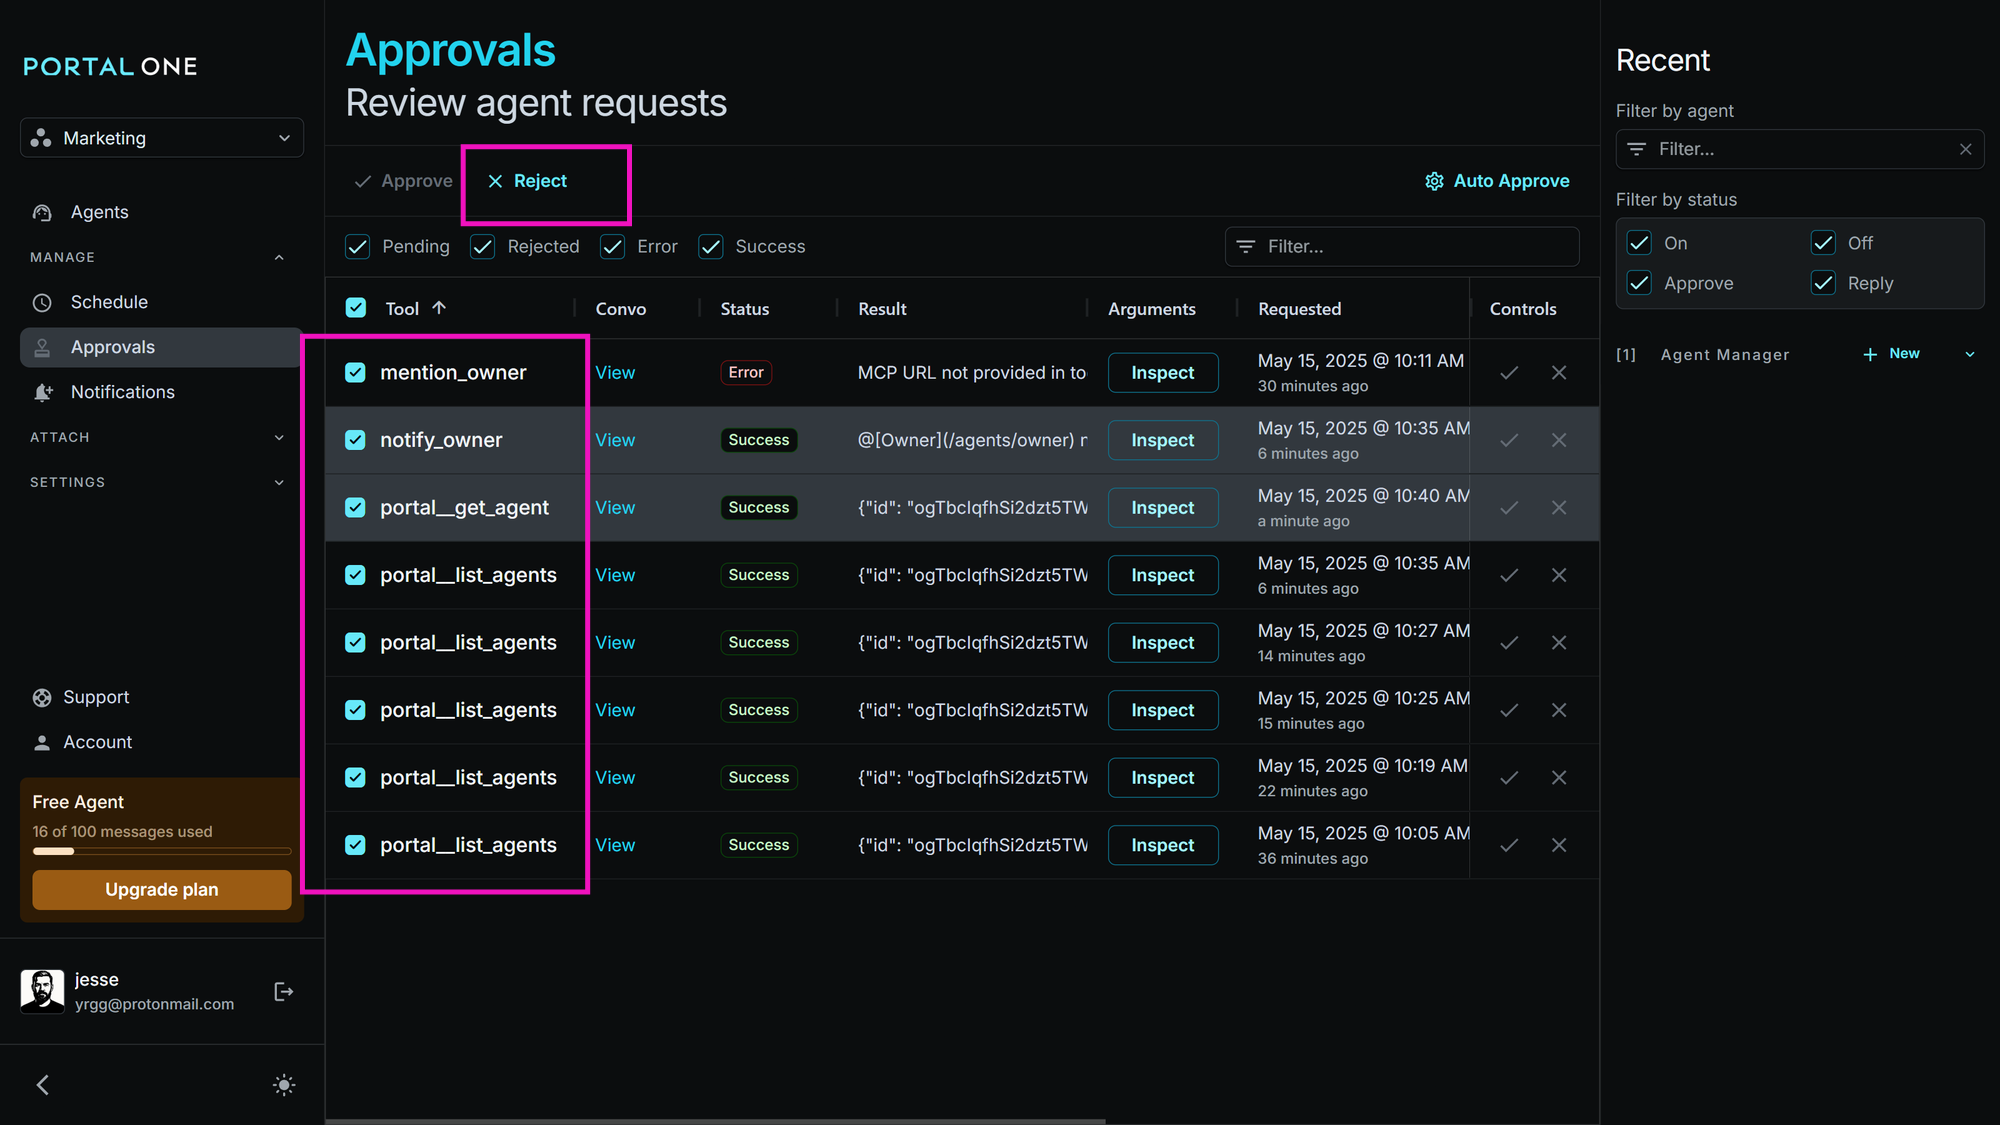
Making Your Decision: Approve or Reject
Once you've reviewed (and optionally modified) an action:
- To Approve:
- From the Approvals table, select the row(s) and click the main "Approve" button.
- To Reject:
- From the Approvals table, select the row(s) and click the main "Reject" button.
Batch Approvals & Rejections
For efficiency, you can manage multiple requests at once:
- In the Approvals table, use the checkboxes to select multiple pending actions.
- Click the main "Approve" or "Reject" button at the top of the table to apply your decision to all selected items.
Advanced Features
As you become more familiar with Portal One, explore these powerful options:
Pro Tip: Auto-Approve Actions
For trusted, routine actions from specific agents or tools, you can set up Auto-Approve rules. This bypasses manual review for these pre-defined scenarios. Look for an "Auto Approve" button or settings area on the Approvals page.
Pro Tip: Utilize the Audit Trail
The Approvals table serves as a comprehensive audit trail. You can filter the table by "Status" (e.g., Success, Rejected), "Agent," or "Approved By," and sort by various columns to review historical agent activities and decisions for compliance and analysis.
Quick Reference: Action Approvals
- Find Pending Actions: Click "Approvals" in the navigation pane (badge indicates pending).
- View Details: Click "Inspect" on an action row.
- Edit Arguments: Modify parameters within the "Inspect" dialog.
- Approve/Reject: Use "Approve" or "Reject" buttons (in main table).
- Batch Actions: Select multiple rows for bulk approval/rejection.
- Notifications (for Approvals): Check "tool call" cards in agent chats & "Approvals" badge.
Glossary: Key Terms
- Human Oversight: The overall principle of user control over AI agent actions and communications.
- Action Approval: The specific process of reviewing and authorizing an agent's use of an MCP tool.
- MCP (Model Context Protocol): A system allowing AI agents to securely access and use external tools and services.
- Tool / MCP Tool: A specific function or capability an agent can use via an MCP server (e.g.,
list_agents,send_email). - Tool Call: An agent's attempt or request to use an MCP tool.
- Arguments: The data or parameters an agent provides to a tool when making a tool call.
- Pings & Notifications: As covered previously, a system where agents alert users to check the main conversation for updates or queries.
Why Human Oversight (for Actions) is Key
This approval step for agent actions is fundamental to using AI agents responsibly and effectively. It empowers you to:
- Ensure Quality: Catch errors or suboptimal outputs from tool usage.
- Maintain Compliance: Prevent tool-driven actions that might violate policies.
- Build Trust: Deploy agents confidently with final say over their powerful operations.
- Iterate Safely: Test new agent configurations and tool integrations without risk.
By mastering both Pings/Notifications for drawing attention to conversations and Action Approvals for tool usage, you unlock the full, secure potential of your AI agents in Portal One.